Introduction: Wobbly Ladders and That Gut-Twisting Feeling
Have you ever climbed a ladder that felt just a little off? Maybe one leg was sinking into a soft patch of lawn, or the whole thing felt like it was doing a weird lean to the side. You took a step… and your stomach did a back-flip. Yeah, we’ve all been there. It’s that heart-pounding moment where you wonder if you’ll finish the job or end up flat on your back.
That’s exactly why using a ladder stabilizer on uneven ground isn’t just smart—it’s essential.
In this guide, we’re going to break it all down like you’re chatting with a good friend who just happens to be a ladder safety nerd. I’ll show you:
- What a stabilizer is (and what it isn’t),
- Why uneven ground is sneakier than it looks,
- The major benefits of using a stabilizer (beyond the obvious “not falling”),
- What kind you need (without getting overwhelmed),
- And finally—how to use one the right way.
Let’s get into it. Because your safety deserves more than just a hope and a prayer.
What Is a Ladder Stabilizer? (And Why It’s More Than Just Fancy Gear)
It’s Like Giving Your Ladder Some Much-Needed Balance
Let’s say your ladder is like a clumsy giraffe. It’s tall, awkward, and can tip over without warning. A ladder stabilizer is like a smart pair of shoes—ones that actually grip the ground and balance out any unevenness beneath.
A ladder stabilizer is a device you attach to the ladder to widen its base or adjust for uneven terrain. It works by either:
- Extending the ladder’s legs to match the ground’s slope, or
- Anchoring it more securely using a wide or adjustable base.
The goal? Total balance. Even on that patchy hill behind your garage.
But Wait, Isn’t That Just a Leveler?
Good question. People often confuse stabilizers and levelers, but here’s the deal:
- Ladder Levelers are adjustable feet or legs that you can manually change to match the terrain. Think: one leg longer, one leg shorter.
- Ladder Stabilizers usually refer to broader base supports (like outriggers) that keep the ladder steady sideways and reduce wobble.
They’re sometimes sold together, or as part of the same setup, but they’re doing slightly different jobs. The leveler handles up-down adjustments. The stabilizer handles side-to-side sway and grip.
Still with me? Cool—because the next part gets real.
The Real Dangers of Uneven Ground (And Why You Should Never “Wing It”)
Let’s not sugarcoat it: uneven ground is a trap. It doesn’t always look dangerous—but it’s one of the top causes of ladder-related injuries.
According to OSHA, improper ladder setup is one of the most common safety violations in construction and home repair. And guess what? Most of those violations come from ladders tipping over—often because they weren’t stable on the ground.
Here’s Why That Happens:
- One leg sinks into soft soil or gravel.
- The angle isn’t right. (It should be a 75° angle, or a 4:1 ratio of height to base distance).
- You’re using makeshift supports. Bricks, rocks, wood scraps—don’t lie, we’ve all done it.
- The ladder shifts as you climb. Your weight moves upward, changing the balance and increasing the risk of a fall.
And the results?
- Twisted ankles
- Broken wrists
- Concussions
- Or worse.
Can you imagine falling from 12 feet up while holding a paint bucket? It’s not just painful—it’s potentially life-altering.
Benefits of Using a Ladder Stabilizer on Uneven Ground
Alright, let’s switch gears. You’re here because you don’t want to be a statistic. So what do stabilizers actually do for you?
No More Wobble = Peace of Mind
This one’s obvious, but it’s powerful. When your ladder isn’t rocking or shimmying, you can focus on the job—not your balance. It’s a confidence booster.
Avoid Sketchy Workarounds
You’ve probably seen (or done) this:
- A stack of bricks under one leg
- A shovel propping up the base
- A friend holding the ladder (bless their heart)
Stabilizers eliminate the need for any of that DIY danger. They do the job better, faster, and way more reliably.
Safer on Slopes, Hills, and Weird Terrain
Whether you’re working:
- In your backyard on grass,
- On a slope near your driveway,
- Or on gravel beside a fence,
Stabilizers adjust to the surface and distribute the weight. So even if the ground’s weird, your ladder won’t be.
Complies with Safety Standards
Using a stabilizer or leveler means you’re following OSHA and ANSI recommendations for safe ladder use. That’s especially important for contractors, pros, and job sites. It’s not just safer—it’s legally smart.
Faster Setup, Less Headache
Once you’re familiar with it, a stabilizer saves you time. No more trial-and-error balancing. Just attach, adjust, and get to work.
You Look Like a Pro
Let’s be real: using proper gear looks good. Whether it’s your neighbor watching or your boss, having the right tools shows you know your stuff.
Types of Ladder Stabilizers (And How to Pick the Right One)
Alright—time to nerd out a little. There are different types of stabilizers out there, and not all of them work the same.
Manual Levelers (Adjustable Legs)
- Attach directly to the ladder’s legs
- You adjust each leg manually to the ground height
- Great for frequent users or uneven yards
- Lightweight and compact
Best for: Homeowners, handymen, painters
Outrigger Stabilizers
- Attach to the ladder sides and extend outward
- Widen the base significantly
- Reduce side-to-side tipping
- Very sturdy on steep terrain
Best for: Pros on tough outdoor jobs
Self-Leveling Stabilizers
- Automatically adjust to the terrain
- Some have hydraulic or spring mechanisms
- Quick setup, no manual leg tweaking
- Usually pricier, but super handy
Best for: Contractors, multi-surface jobs, frequent users
Rubber-Padded Base Stabilizers
- Great for indoor use
- Won’t scratch floors or slip on tile/hardwood
- Often included with indoor ladder kits
Best for: Painters, decorators, electricians indoors
Things to Look For:
- Weight Capacity: Match to your ladder and body weight.
- Material: Aluminum = light, Steel = durable, Rubber = grippy.
- Portability: Need to carry it around? Go lightweight.
- Compatibility: Make sure it fits your ladder model.
Real-World Wisdom: Tips, Cautions & What Not to Do
Smart Habits from the Field:
- Always check the ground first—remove rocks, debris, or slick patches.
- Make sure all feet are solidly planted and not on moveable surfaces.
- Use a stabilizer on both sides, if possible.
- Triple-check the locks or clamps on manual levelers.
- Follow the 4:1 ladder setup rule: 1 foot away for every 4 feet of height.
Avoid These Common Mistakes:
- Relying on someone to “hold” the ladder instead of using equipment.
- Using bricks or boards to level—dangerous and unstable.
- Ignoring wind or slick conditions (especially on slopes).
- Placing the ladder on icy, muddy, or newly rained-on terrain without stabilizing gear.
Remember: stabilizers are tools—not magic. They help immensely, but you still need to be thoughtful and alert.
Quick Setup Checklist (Save This for Later!)
Here’s your friendly stabilizer setup checklist:
- Choose the right stabilizer for the job.
- Attach it securely to your ladder’s base or rails.
- Adjust the legs or arms to match the terrain slope.
- Test weight gently to ensure zero wobble.
- Follow the 4:1 ladder angle rule.
- Maintain three points of contact as you climb.
Stick to this, and you’ll be golden.
Why You’ll Fall in Love With Using a Stabilizer (Friend to Friend)
Honestly? The best thing about using a ladder stabilizer isn’t just the safety—it’s the peace of mind.
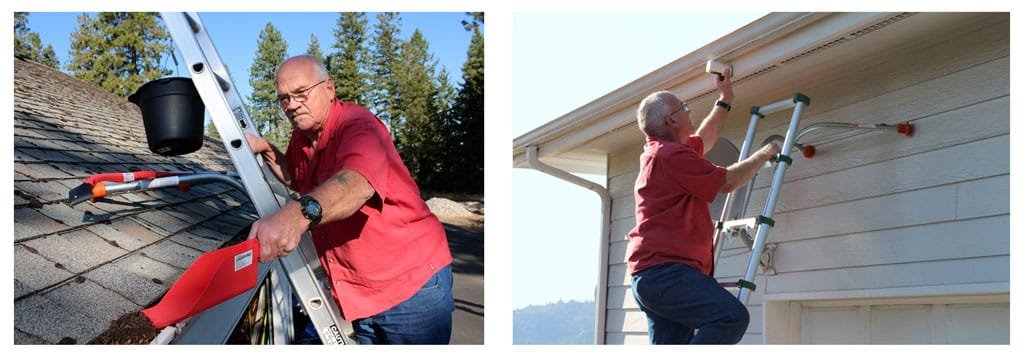
When you climb a ladder that’s solid and unmoving, there’s this instant wave of confidence. You’re no longer second-guessing every step. You’re not hoping the ground holds or praying the bricks underneath don’t shift. You’re just focused on the task—whether that’s painting trim, cleaning gutters, or installing lights.
“It felt like having a reliable friend there, silently saying: I got you.”
Can you imagine how much more productive you’d be if that fear of falling just disappeared? That jitter-free climb? It’s a game-changer. It brings relief, pride, and a sense of control.
For anyone who’s ever hesitated before stepping onto a ladder on bumpy or sloped ground, a stabilizer isn’t a “nice-to-have”—it’s your new must-have tool.
Wrap-Up: Key Takeaways
Here’s your quick recap:
|
Reason |
Why It Matters |
|
Prevents tipping |
Keeps your ladder rock-solid, even on slopes |
|
Saves time |
Fast setup, no DIY support needed |
|
Boosts confidence |
Work without fear or hesitation |
|
Adapts to any terrain |
Gravel, grass, stairs—no problem |
| Makes you look pro |
Proper gear = smart, capable, and safe |
Advanced Tips for Using Ladder Stabilizers Like a Pro
Even though ladder stabilizers are pretty straightforward, there are a few extra tricks that can take your setup—and safety—to the next level. These are things many pros learn the hard way (or after years of doing things the sketchy way).
Double-Check the Attachment Points
Some stabilizers attach to the sides of the ladder rails, while others connect to the feet. Make sure:
- They’re tight and secure (no wiggling allowed).
- You’ve read the manual—yes, the actual manual—for specific instructions.
- You test the ladder before climbing by gently shaking it from the base.
Friendly tip: It’s worth spending an extra 30 seconds checking the bolts than spending 6 weeks in a cast.
Know the Surface You’re Working On
Here’s something you might not realize: different surfaces react differently under a ladder—even with a stabilizer.
|
Surface |
Pro Tip |
| Grass/Soil | Use stabilizers with spikes or wide feet to prevent sinking. |
| Gravel | Clear loose stones first and use rubberized grips. |
| Concrete/Tile | Go for non-slip rubber feet to avoid skidding. |
| Wood Decking | Avoid sharp stabilizer feet unless padded to prevent damage. |
Weather Still Matters (A Lot)
Yes, even with a stabilizer, things like wind, rain, and ice can make ladder work risky. Always consider:
- Wind gusts (especially when using extension ladders).
- Wet or muddy ground causing foot slippage.
- Heat expansion in metal stabilizers making them loosen over time.
Set a personal rule: If the weather makes you hesitate, postpone the job. No project is worth a fall.
Bonus: Common Myths About Ladder Stabilizers (Busted!)
Let’s clear up a few common misconceptions floating around out there.
“I don’t need one—I’ve got strong balance.”
Sorry to break it to you, but balance doesn’t stop gravity. The ground shifts. Your tools shift. Accidents aren’t about you being clumsy—they’re about the unexpected.
“I’ll just use bricks or wood blocks—it’s the same thing.”
Nope. That’s a band-aid on a bullet wound. Stabilizers are designed to distribute weight evenly and grip surfaces. Bricks can crack, shift, or slide. Blocks can sink unevenly.
“I only use a ladder for 5 minutes at a time.”
Injuries don’t care about time. Most ladder accidents happen within the first few minutes—right when you think it’s “no big deal.”
Let’s Recap: Why This Matters So Much
Before we wrap up, let’s revisit why using a ladder stabilizer on uneven ground isn’t just a smart move—it’s a no-brainer.
- It prevents dangerous tipping.
- It adapts to slopes, hills, and soft ground.
- It’s OSHA-recommended and often required for job sites.
- It helps you avoid sketchy setups that you’ll regret.
- It boosts confidence, safety, and productivity.
Emotional truth? There’s nothing more empowering than climbing a ladder and feeling like it’s part of the ground—not an accident waiting to happen.
- A real-world scenario walk-through,
- A detailed comparison of popular stabilizer types, and
- A printable/downloadable checklist for ladder safety.
Real-World Scenario: What Happens With vs. Without a Stabilizer
Let’s walk through two versions of the same task—say, cleaning gutters on a slightly sloped backyard.
Without a Stabilizer:
You lean your extension ladder against the roof, plant it on what looks like stable grass, and wedge a few rocks under one leg to “level it out.” Everything seems fine until you’re halfway up—then one leg starts to sink just a little.
It’s subtle at first. A slight lean.
But now, your weight shifts. You feel the ladder move under you. Your heart races. You try to grab the roof, but it’s too late.
You land flat on your back, lucky to walk away with only bruises.
With a Stabilizer:
You pull out a manual leveler. In 90 seconds, you adjust the legs to match the slope. You give it a test shake. It’s rock solid.
Now, you climb with confidence. The ladder doesn’t shift, doesn’t sink, doesn’t scare you. The job is done in 15 minutes—and you’re still standing.
See the difference?
The stabilizer didn’t just help you do the work. It helped you do it without fear.
Comparing Types of Ladder Stabilizers
Let’s break down the most common types with a side-by-side comparison:
| Type | Pros | Cons | Best For |
| Manual Levelers | Affordable, easy to install, compact | Requires manual adjustment | Homeowners, painters |
| Outrigger Arms | Very stable, ideal for uneven ground | Bulky, may need more storage space | Roofers, landscapers |
| Self-Leveling Systems | Fast, automatic, great for job sites | Expensive, may be heavier | Contractors, pros |
| Rubber-Padded Feet | Protects indoor surfaces, non-slip | Not ideal for extreme slopes | Indoor projects, flooring jobs |
Printable Ladder Stabilizer Setup & Safety Checklist
Want a checklist you can print and keep in your garage, toolbox, or work van? Here’s a simple, practical list you can refer to every time you use your ladder:
Ladder Setup Checklist
- Inspect ladder and stabilizer for cracks, loose parts, or rust
- Attach stabilizer securely to ladder rails or feet
- Adjust stabilizer for terrain (legs or arms)
- Test the ladder with gentle pressure before climbing
- Set the ladder at the 4:1 angle (1 ft out for every 4 ft high)
- Check that feet are not resting on loose debris or wet patches
- Wear non-slip shoes and avoid climbing with heavy tools in hand
- Maintain 3 points of contact at all times
- Never overreach—move the ladder instead
- Don’t climb higher than recommended on your ladder model.
Feel free to copy this and stick it on your garage wall. Trust me—future you will thank present you.
Final Encouragement: Invest in Safety, Reap the Rewards
If you’ve made it this far, you’re clearly the kind of person who cares—about the quality of your work, your safety, and maybe even the people counting on you to come back down in one piece.
So here’s your friendly nudge: Get a ladder stabilizer. Use it every time the ground is uneven. Make it a habit, not a hassle. Because once you feel how solid your ladder becomes, you’ll never go back to risky setups again.
It’s one of those small changes that makes a huge difference. Like wearing a seatbelt. Or double-knotting your boots before a hike.
You might only use it for 10 minutes—but it could save you months of pain.
Final Thoughts: A Small Tool, A Massive Difference
Let’s be honest—using a ladder on uneven ground without a stabilizer is like texting while driving. It might seem fine for a minute… until it isn’t.
With just one affordable, easy-to-use tool, you eliminate so many unknowns:
- Will the ground hold?
- Will the ladder shift?
- Will this job end in a trip to the ER?
Those questions disappear when you’re backed by a solid, well-placed stabilizer. Instead of second-guessing your setup, you’ll feel steady, confident, and ready.
And that feeling—that quiet confidence when you step onto a ladder and know it’s solid? That’s everything.
So whether you’re a pro on a worksite or a weekend DIYer just trying to fix the gutters before dinner, remember this:
Don’t risk the fall. Stabilize it all.
You—and everyone who counts on you—will be glad you did.
Please read more about the best ladder stabilizer.
Helpful FAQs About Ladder Stabilizers
Can I use a ladder stabilizer on stairs?
Yes! Some stabilizers and levelers are specially designed for stairs. They let you adjust each leg independently so the ladder stays level, even across different steps.
How much unevenness can a stabilizer handle?
Most manual levelers handle 8–12 inches of uneven terrain. Some advanced automatic stabilizers can adjust to even more extreme differences—up to 27 inches in certain models.
Do ladder stabilizers work on gravel or soft soil?
Absolutely. In fact, that’s where they shine. Look for models with spiked or rubber feet for better grip in loose or soft terrain.
Are stabilizers heavy or hard to attach?
Not at all. Most are lightweight (aluminum is common) and designed for fast attachment. Some even clip on or slide over your ladder feet in seconds.
Do I still need other safety gear if I use a stabilizer?
Yes! A stabilizer helps, but you still need to:
- Set up your ladder at the proper angle
- Maintain 3 points of contact
- Avoid working in bad weather
- Wear non-slip shoes
A stabilizer is just one part of staying safe up high.